For video viewers, it would be annoyed to watch videos with subtitle, text and image on them. But if you are videographer, video author, video publisher or video webmaster, it is important to add image with personal info and logo to videos before upload them to sharing websites, which could be effective way to prevent others from copying and using your video without your authorization. What’s more, watermarking your videos is fairly an easy method to brand your videos. The whole process can be done in just sample steps. With a proper tool, anyone can do it.
To add image to video, a handy and powerful image watermarking tool is needed. However, there are so many tools claiming that they can watermark video effortlessly, how can we choose a right one among them? Here I listed some features a good watermarking tool should have:
1 - Provide a wealth of image watermark materials, allow you load your image from PC and add it to video.
2 - Have rich features to help edit image watermark
3 - Allow you add text to video.
4 – Help to convert video formats with high quality.
5 – Watermark videos in batch.
6 - Easy to use.
Video Watermark allows you to embed text, image, logo, sign (include animated) to your video in batch mode, and it is also a video conversion software. With its intuitive and user-friendly interface, the process of watermarking becomes very easy. Everyone can complete the watermarking task with few clicks, it is an excellent solution to protect and annotate your videos.
Click https://www.video-watermark.com/products/video-watermark.exe to download and install Video Watermark and install to your PC.

After installed Video Watermark program, launch it. You will come to its friendly main interface, click 'Add Video' button to import source videos to program.
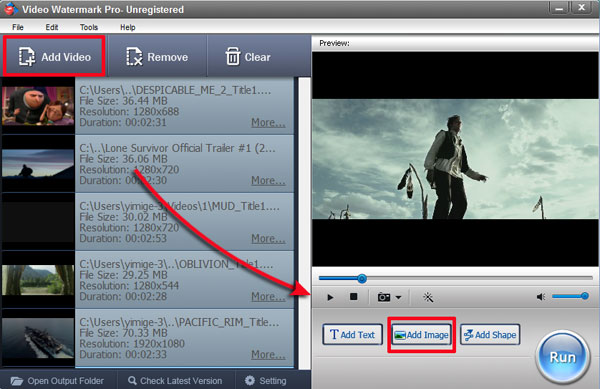
Click 'Add Image' button to go to image watermark editing interface. Here you can add image watermark to video and edit image watermark at your will.
1. Click 'Add' button to create an image watermark layer, you can start editing with the layer.
2. Click 'Browse' button to load watermark from your disc, or select an existing image watermark, we have over 150 watermarks, also include animated watermark.
3. Drag the watermark to appropriate location of video screen. You can adjust opacity, rotation and arrangement.
4. Click 'Ok' return to main interface.
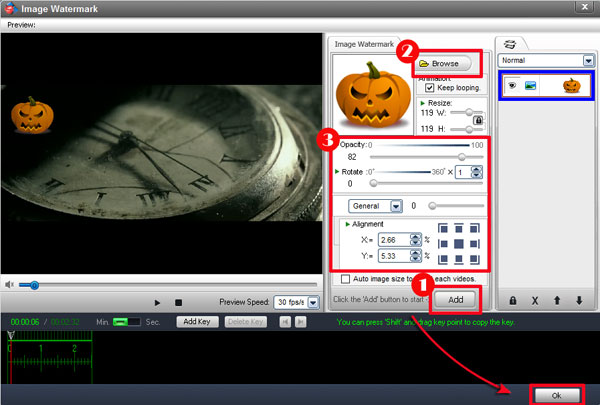
Note: you can create many complicated watermarks with time line.
1. Select an output folder or keep original folder.
2. Select an output video format, we have most popular video formats includes AVI, MPEG, MP4, WMV, MKV, MOV, RM, 3GP, FLV, SWF, VCD, DVD.
3. Click 'Run' button to starting watermarking videos.
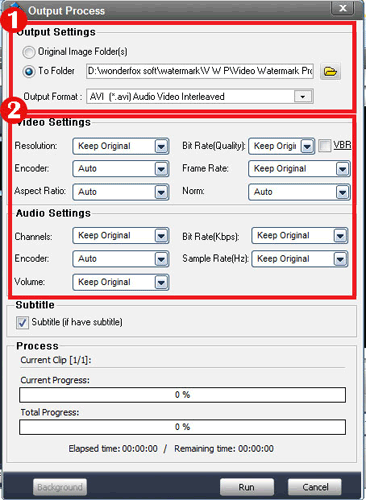
Note: Video settings - adjust video quality, video resolution, frame rate, video encoder, etc. Audio settings - In most, you do not need make any changes.