I have saw many times that people are looking for good and free video watermark software. Here I will introduce an easy way to get excellent video watermark program - Video Watermark.
Video Watermark is one of the best video watermarking and retouching programs, it allows you to embed text watermark, image watermark (include animated one), logo, sign, copyright symbol… to your video. With its straightforward and friendly interface, you can finish the whole watermarking process with a few clicks. You should never miss this excellent solution to protect your video.
Its original price is $49.95, but now you have a chance to get it for completely free with TrialPay. Trialpay works with leading companies across many industries, including software, social apps, retail and more. To get Video Watermark program for free, you just need to follow steps below to complete a TrialPay offer.
Step 1, Click https://www.video-watermark.com/uninstall.html to start TrialPay offer.
Step 2, After you complete Step 1, you will receive an email with the registration key of Video Watermark.
Step 3, Click https://www.video-watermark.com/products/video-watermark-pro.exe to download unregistered version of Video Watermark and install to your PC.
Step 4, Register your software with registration key you received.
The following part will briefly guide you how to insert image watermark to video, if you want to learn detailed tutorial, please click here >>
Step 1 Input Source Video
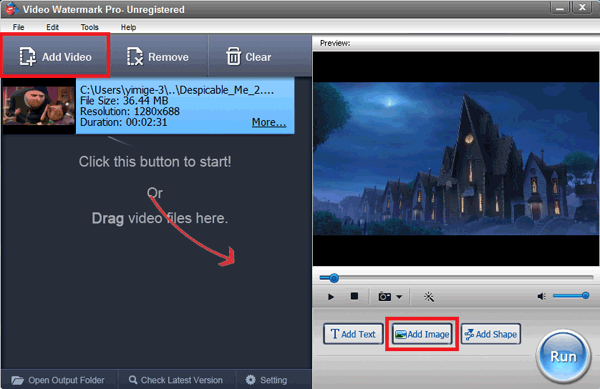
After Video Watermark has been installed, launch it, you will come to its friendly main interface. Click 'Add Video' button to load source videos to videos list. Then, click 'Add Image' button to jump to image watermark editing interface.

Step 2 Create a New Layer and Add Image Watermark
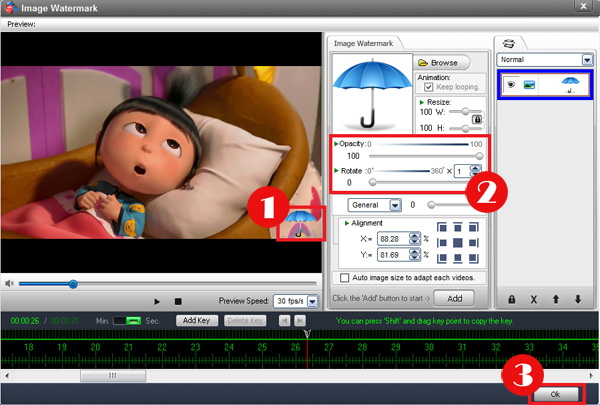
①First of all, you need to click 'Add' button to create a new watermark layer.
②After that, click 'Browse' button to load image from your hard drive, or you can choose free watermark materials we provided. There are over 150 watermark materials, including animated watermarks.

Step 3 Edit and Customize Image Watermark
① Drag image watermark directly over the preview window to adjust its position.
② You can also set its opacity, rotation and more.
③ After all is done, click 'Ok' to go back to the main interface.

Tips: If you want to can create dynamic effects with time line, please click here >>
Step 4 Output Settings
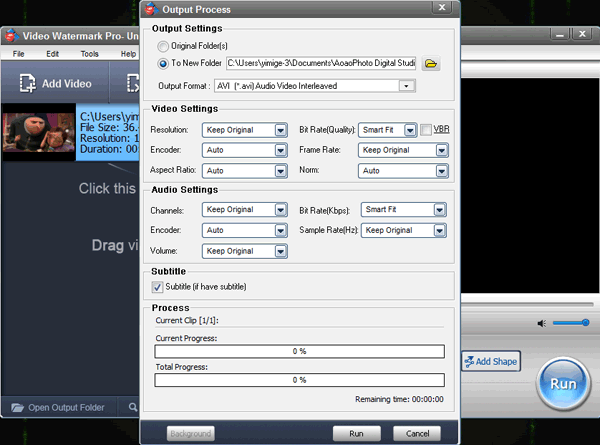
In the main interface, click 'Run' button to jump to output setting interface.
① Select output folder you want or keep original folder.
② Select output video format. All poplar video formats are provided, including AVI, MPEG, MP4, WMV, MKV, MOV, RM, 3GP, FLV, SWF, VCD, DVD, etc.
③ You can also change video/audio settings yourself.
④ At last, click 'Run' button to start watermarking videos.

Tip: you can click 'Background' to minimize the window and keep it running in the background.
Have a free trial below: