In many cases subtitles are necessary when you’re watching movies with language which is different from your mother tongue, and movies centering on certain field you are not familiar with. But not all videos have subtitles so that you need add a subtitle to movie. If you have an external subtitle in SRT, ASS or SSA (the type of media file containing subtitle information) for your movie, you can easily add subtitles to a movie.
Typically subtitle files are not played on their own, but alongside another type of video file. To do this, you'll need to use a computer media program that is capable of displaying SRT file and video file at the same time. You can use VLC Media Player, which is an open-source freeware capable of playing many different video file formats.

Before you play movies with VCL, make sure subtitle file and the video file store under the same name (like, Iron-man.avi and Iron-man.srt) and in the same folder on your computer. Then, and click "Open Folder" on drop down menu. Select the folder that your SRT file and the video file are in and they will both begin to play.
If you do not have subtitle files and want to make and add a subtitle or caption to a movie or homemade video by yourself, a very efficient tool to make your own subtitles or captions is needed. Here we will take practice of making and adding subtitle to movie with Video Watermark Pro. Video Watermark Pro is the easy to use software which could enable you to add subtitles to movies and video clips as well as watermark your homemade video to brand your original video. Click to download Video Watermark Pro.
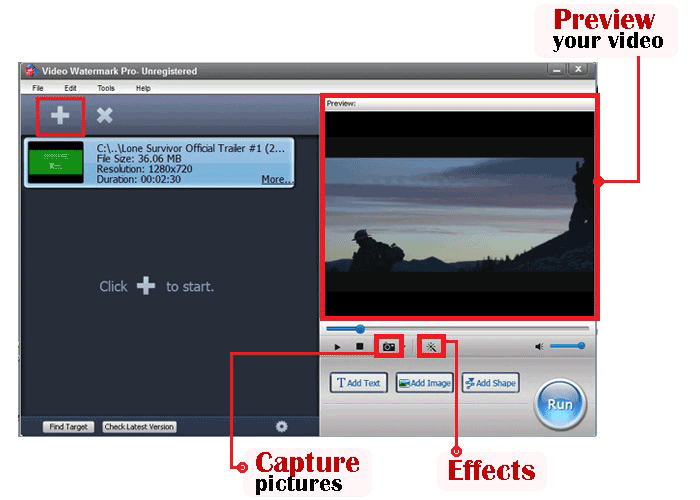
Launch Video Watermark Pro and click “+” to load the movie you want. Except subtitle effect, you can also add image and logo watermark to your video files to protect your original video.

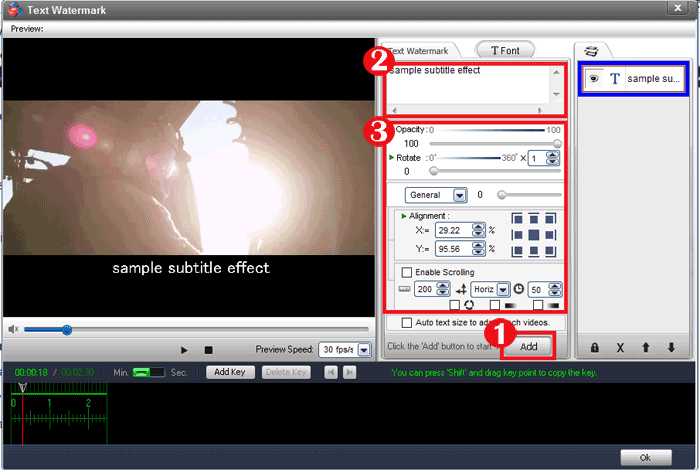
Then, hit “Add Text” button to go to text watermark interface.
①Click “Add” button first to create a text layer where you can edit your text subtitle.
②Type some words you want in the textbox and then jump to Font Setting Interface to edit more about font by clicking “Font” button.
③Adjust the value of transparency and rotate your text. Adjust position of watermark over the photo. You can also drag text subtitle in preview window to change its position.

After you complete all common settings of text watermark you need, you will find the following part on text interface. This part shows the timeline of the video selected.
①Set a key point on time you want by clicking “Add Key”. Here we set a key point on the eighth second. (The text watermark will begin to show up from the first key point you set.)Then, click this key point you set to change parameters of this key point (like “Opacity”, “Rotate”, “Alignment”, etc).
②Set another key. Here we set this key point on twelfth second. The words on this text layer will show up from eighth second to twelfth second.
③Repeat the process of adding text layer and customizing them for the video file that you imported. Then click “OK”, you will back to main interface.

Tips: “Add Key” function is the most powerful and important function of Video Watermark Pro, which can help user to achieve dynamic effect of watermark with ease, just like subtitle effect on a movie.
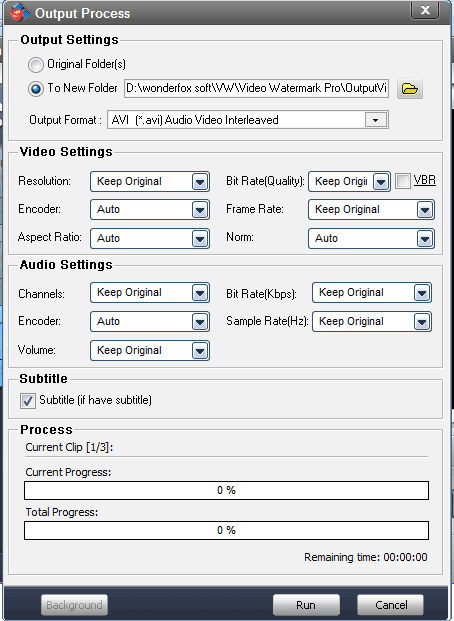
After all settings you need have been done, click “Run” button, the output interface will pop up.
①Specify output folder and output format. There are a wide range of video formats provided for you, including AVI, MPEG, MP4, WMV, MKV, MOV, RM, 3GP, FLV, SWF etc.
②Click “Run” button to start watermarking video.
