There are three types of watermarks frequently searched on the web: photo watermark, video watermark and PDF watermark. Here we will focus on video watermark, also called movie watermark. To learn more about photo watermark, click here >>
Video watermark is a visible embedded overlay over a digital video; it could be text, a logo, or a copyright notice. The purpose of video watermark is to declare the ownership of this video work and discourage unauthorized copying and using. Although there is no good way to completely prevent online videos from being stolen (videos can be viewed on computer have the possibility to be stolen), watermarking videos makes it more difficult for downloading and re-editing. For those who often create and publish videos, video watermarking program is necessary tool to add watermark to movie and copyright video works.

Movie watermark can be a small logo or signature displayed throughout the whole movie, or a big company logo at the very beginning. Common users will embed a watermark throughout movie/video and Hollywood movie studios will add their logo at the beginning of movie. Either way, adding watermark to movie is a great way to promote your website or company. See the samples below.
Let’s start to learn how to add watermark to your movie with simple steps.
Watermark movie will re-encode your movie, and the process of re-encoding may cause some changes like resolution, encoder, frame rate, sound, etc. So, backup original movie is necessary for every beginner. If you want to add watermark to batch of movies at once, please backup all of them first.
Next, a good video watermarking program will be needed. You can open Google and type “video watermark”, “movie watermark” to find the right one for yourself. Here we will use Video Watermark Pro to do the task. Learn more details and features of Video Watermark Pro >>
More details about Video Watermark Pro >
Download Video Watermark Pro by click button below:
After download, please install the software to your computer, and keep reading.
After the program has been downloaded, install it and keep reading. Three Simple Steps to Add Watermark to Movie
Step 1 – Load Video to Program
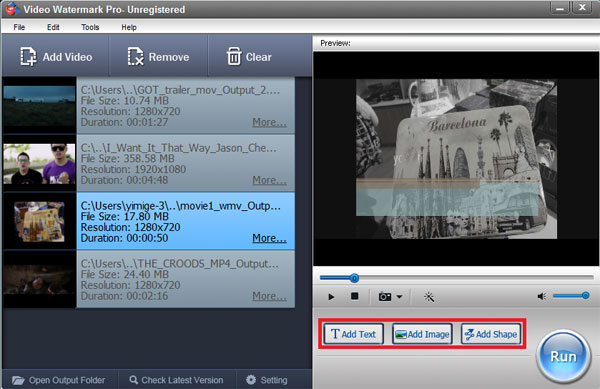
Launch Video Watermark Pro, you will see the intuitive and friendly interface.
On its main interface, add your source videos by clicking "Add Video" button.
After videos have been loaded, see panel under preview window. Here are three big buttons with main functions “Add Text”/”Add Image”/”Add Shape”. Here we click "Add Image" to jump to create and add image watermark to movies.

Step 2 – Customize Image Watermark
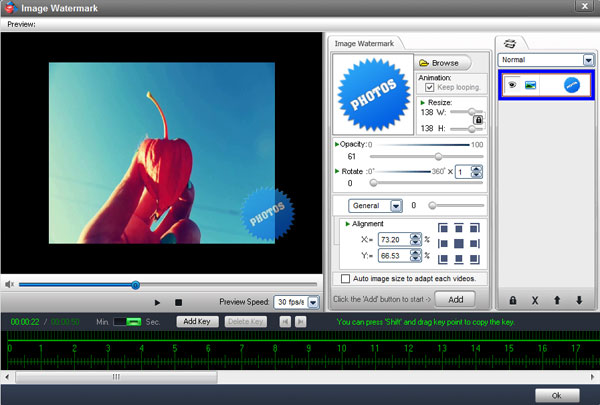
On its editing panel, you will see preview window and many editing options. The very first thing you need is to click “Add” button to create a new layer, all settings will be saved on this layer. To add more image watermarks, you can overlay more layers on video. Click "Browse" button to open material library (over 100 image watermarks are provided), you can select one from list or load your own image/logo by clicking "Load Watermark".
Other settings are also available, such as resizing, rotation, opacity, alignment, etc.
After done click "Ok" button to apply all of settings and go back to its main interface.
Tips: You can control its appearing/disappearing time and make watermark dynamic with timeline feature. Click to learn how to watermark videos with timeline. If you need batch watermark videos, please tick the option "Auto image size to adapt each video".

Step 3 – Output Settings
On its main interface, click "Run" button to go to output setting panel.
Here you need to select output folder > select output video format and > video & audio setting (optional) > start the process of embedding image/logo into videos.
After process has been completed, the output folder will be opened automatically.
Video Watermark Pro allows user embedding text, image (include animated), logo, signature to videos in batch mode. It has simple operation, friendly interface and high speed performance, so the whole process will be finished in minutes.