If you’ve always been fascinated by how well some YouTube videos or commercial videos and want to make some your own. Before you put them online, you need to authorize your own videos first. If you want to protect your video work, make it more distinguishable and even professional, you should consider adding your signature or logo. Watermarking video is fairly effective if you don't mind the text watermark/logo across the top of your videos but it can be time-consuming at the same time. So a good video watermarking software is needed to help you insert any logo and text information you need easily and quickly.
This guide will enable you to put watermark over an existing video. This watermark can be text, image and GIF animation. It is better for you to notice that if you wish to put watermark on video, you must re-encode your video, Video Watermark Pro is an all-in-one tool for watermarking and re-encoding video, you can also change output video format with Video Watermark Pro.
1. Video Watermark 4.5
(Click https://www.video-watermark.com/products/video-watermark-pro.exe to download, or click button below:)
2. Image creation software
This is for creating image that you want or you can just use the materials provided by Video Watermark Pro.
In this part, I will show you how to put different text watermarks on video and make these different text watermarks display at different time intervals.
Step 1 Load Source Video
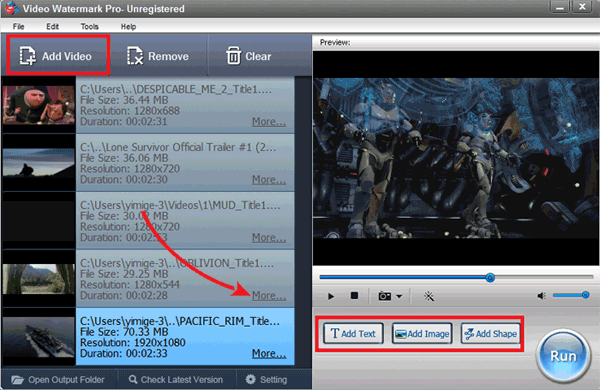
Download Video Watermark Pro first. Click 'Add Video' button to load video from your disc. Click 'Add Text' button to go to text watermark interface.

Step 2 Edit Text Watermark
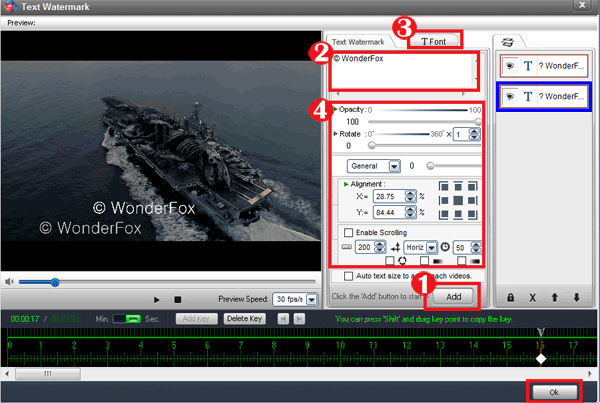
①Click the 'Add button' to create a text layer, all of settings base on the layer.
②Words - Input some words or symbols like © that you want
③Font Setting - Click 'Font' button to go to Font Setting interface
④Alignment - Drag your text to appropriate location in screen. Other settings (Opacity, Rotate)

Tips: you can make some effects of text by Font settings.
Step 3 Set Key Point
Key Point - Create key point to set a number of different text watermarks display at different time intervals. What’s more, you can create animation via two key points.
Create multi-layer to create multi text watermark in different time.
Click 'Ok' to go back to main interface.

Step 4 Output Settings
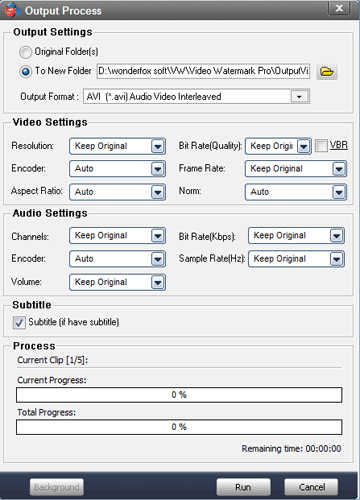
Click 'Run' button to into output interface.
Select an output folder or keep original folder.
Select an output video format, we have most popular video formats includes AVI, MPEG, MP4, WMV, MKV, MOV, RM, 3GP, FLV, SWF, VCD, DVD.
Video settings - adjust video quality, video resolution, frame rate, video encoder, etc.
Audio settings - In most, you do not need make any changes.
Click 'Run' button to starting watermarking videos.

Tip: You can click 'Background' to minimize the window to tray icon.
Step 1, step 3 and step 4 are almost the same as steps of putting text watermark on video. So here we just show you step 2 in details.
Step 1 Load Video to Program
Import source videos – refer to Part 1 step 1
Step 2 Add Image Watermark to Video
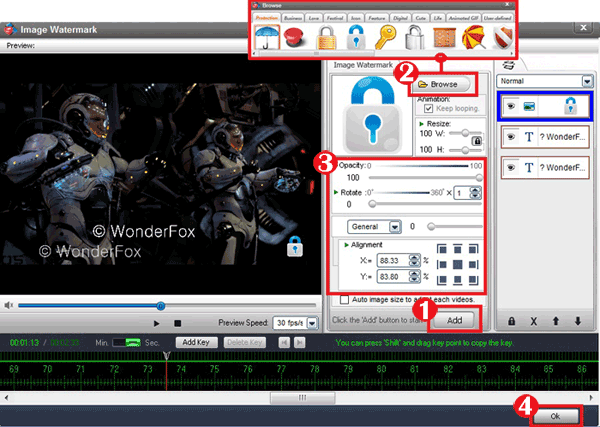
Click 'Add Image' button to into image watermark settings, you can put image watermark to video with this interface.
①Click 'Add' button to create an image watermark layer, you can start editing with the layer.
②Click 'Browse' button to load watermark from your disc, or select a existing image watermark, we have over 150 watermarks, also include animated watermark.
③Drag the watermark to appropriate location of video screen. And then you can adjust opacity, rotation and arrangement.
④Click 'Ok' return to main interface.

Tips: You can create many complicated watermarks with time line.
Step 3 Key Point
Key Point - refer to Part 1 step 3
Step 4 Start Conversion
Output Settings - refer to Part 1 step 4
If you still have any question, please feel free to contact us: support@video-watermark.com or learn more via online guide>>