The watermark is a visible embedded overlay on a video consisting of text, image, logo, animation, or a copyright notice. When some people watching the video, they are will see the watermark.
Add a watermark to video is a common way of identifying that video and protecting them from unauthorized copy and reissue. The purpose of insert watermark to video is to identify the work and discourage from unauthorized use. Though the watermark can not prevent unauthorized copy, but makes it more difficult for those who may want to claim someone else’s video as their own.
.Choose proper video watermark software is best part of watermarking process, it must have some features as below:
1 Must protect your video copyright
Should work well on protecting images, can add text watermark and image watermark to your video, will prevent from removing watermark and stealing the video, satisfy your basic requirements.
2 Must support different video formats
Should support most popular video formats like AVI, MPEG, MP4, WMV, MOV, MKV, 3GP, FLV, SWF, etc. There indeed a lots of video formats here, this is very important. We do not want to converting again after finished.
3 Fast speed and Good quality
Should not spend a lot of time on the watermarking process. No one like waiting long time for anything, so batch watermarking mode is necessary, and, we also do not like low quality videos.
4 Easy to use
With a home program, easy to use is necessary.
Video Watermark is one such software complies with all of the above requirements that allows you to embed text, image, logo, sign (include animation) to your video in batch mode, it have simple operation and friendly interface, so the process of watermarking becomes very easy, you can finish it with few clicks, it is an excellent solution to protect and annotate your video.
Here a tutorial for insert image watermark to video, if you want to learn full guides, please click here.
Click https://www.video-watermark.com/products/video-watermark.exe to download and install Video Watermark and install to your PC.
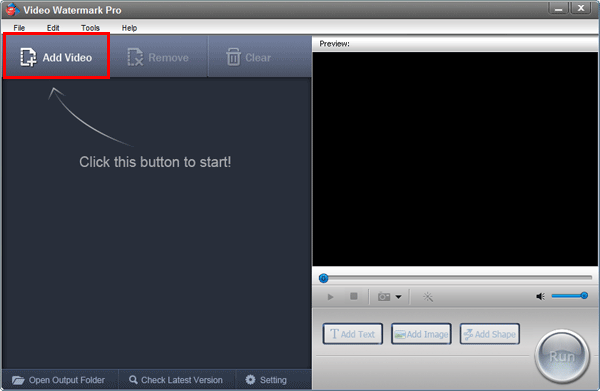
Step 1: After installed the video watermark program, launch it, here a friendly interface, click '+' button to adding video to videos list.

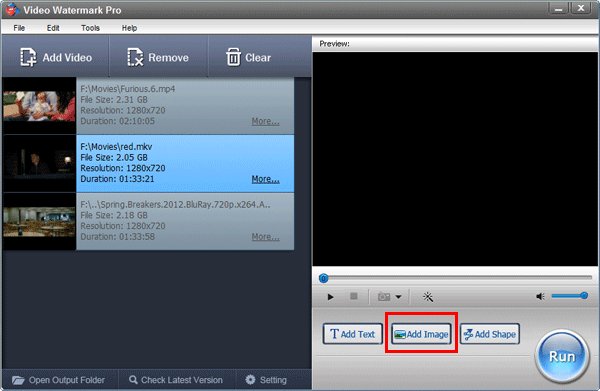
Step 2: Click 'Add Image' button to into image watermark settings, you can insert image watermark to video with this interface.

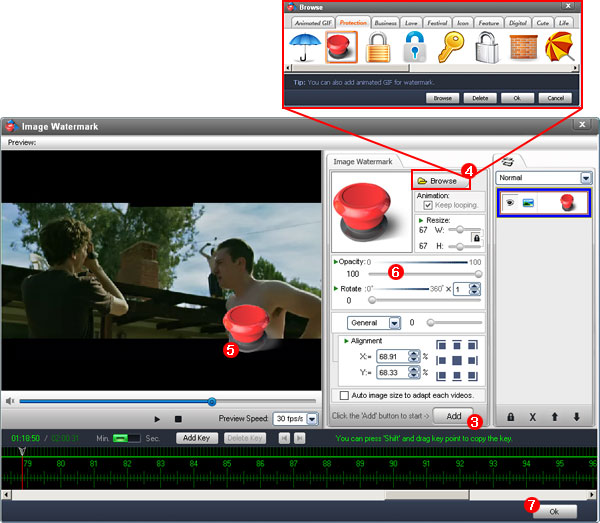
Step 3: Click 'Add' button to create a image watermark layer, you can start editing with the layer.
Step 4: Click 'Browse' button to load watermark from your disc, or select a existing image watermark, we have over 150 watermarks, also include animated watermark.
Step 5: Drag the watermark to appropriate location of video screen.
Step 6: You can adjust opacity, rotation and arrangement.
Step 7: Click 'Ok' return to main interface.
Step 8(optional): you can create many complicated watermarks with time line.

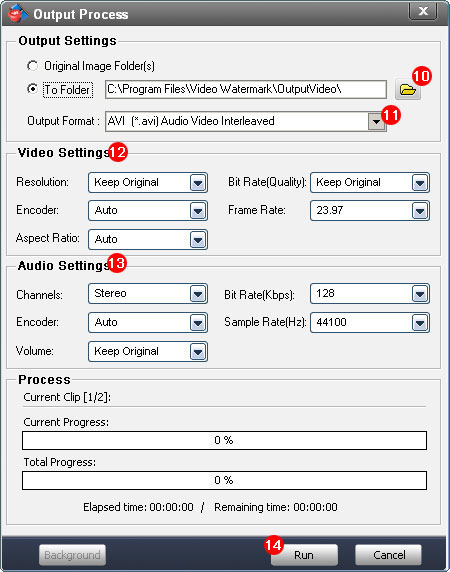
Step 9: In main interface, click 'Run' button to into output setting interface.

Step 10: Select an output folder or keep original folder.
Step 11: Select an output video format, we have most poplar video formats includes AVI, MPEG, MP4, WMV, MKV, MOV, RM, 3GP, FLV, SWF, VCD, DVD.
Step 12: Video settings - adjust video quality, video resolution, framerate, video encoder, etc.
Step 13: Audio settings - In most, you do not need make any changes.
Step 14: Click 'Run' button to starting watermarking videos.
Tip: you can click 'Background' to minimize the window to tray icon.
